This article provides information and instructions for Sky customers who use the Connect for Mobile app on their mobile devices. If you are a MiCloud customer, see the MiCloud Connect for Mobile article.
Overview
The Sky Mobility service extends features of your company's Sky phone system to your employees' mobile devices. This article provides information for managing all aspects of your Sky Mobility service and instructions for downloading, installing, and setting up the Connect for Mobile app on your iOS (iPhone) or Android mobile device. The Connect for Mobile app, which is available to Sky customers for a monthly fee per user, can automatically and securely select the best available network, Wi-Fi or cellular, without any action by the user.
Table of Contents
Supported Features, Devices, and Usage Instructions
Requirements
Change Phone/Voicemail PIN - Warning!
Download and Install App
Provision (Setup and Sign In)
Identify Your Mobility Router
Identify Your Mobility App
Activate Service
Manage Settings
Edit Account Settings
Add Users
Enable Video
Send Provisioning Email
Remove Users
Supported Features, Devices, and Usage Instructions
See the Using Sky Mobility article to access information about supported features and devices, and instructions for using the new Connect for Mobile app on your mobile device.
Requirements
Managed IP phone profile
Change Phone/Voicemail PIN - Warning!
When you have the Sky Mobility service and use the new Connect for Mobile app, if you change the phone/voicemail PIN that you use to access the Sky phone system, you must use the "Change Phone PIN" feature in the Sky Account Portal. For instructions, see the Change Phone/Voicemail PIN Using the Sky Account Portal section of the Password Management article. Following these instructions will update your password on the Mobility Router assigned to your company's Sky account and then synchronize the password change with the Connect for Mobile app on your mobile device.
- WARNING: If you change your phone/voicemail PIN via the voicemail system using a phone, you will NOT be able to use your Connect for Mobile app afterwards. This happens because the voicemail system cannot update your password on the Mobility Router assigned to your company. If this applies to you, you need to create a Support Case to communicate to Support a request to use your new phone/voicemail PIN to update your password on your company's Mobility Router.
NOTE: After changing your phone/voicemail PIN as explained above, if the Connect for Mobile app on your mobile device is not functioning correctly, try closing and restarting the app. If the "Sign In" screen appears, enter your new phone/voicemail PIN in the Password field and tap Sign In. If a red "Establishing Connection" bar appears at the top of the app (and does not disappear on it's own within a minute or so) or if the app has any other problems, tap the Connect logo  at the bottom of the app, tap the gear
  icon in the top-right corner of the app, scroll to the bottom of the Settings screen, and tap Logout. Next, log into the app with your new phone/voicemail PIN.
Download and Install the App
To download and install the new Connect for Mobile app, use the link below for your type of mobile phone:
After installing the new Connect for Mobile app on your mobile device, open the app and use the following "Provision (Set Up and Sign In)" instructions to enter the correct information when prompted on your mobile device. If you have any issues using these instructions, please contact Support.
Provision (Setup and Sign In)
To enable a Sky Mobility user to utilize these instructions, an Authorized Contact MUST first tell the user which SMR value (SMR1, SMR2, or SMR3) to choose when entering the server addresses in the Connect for Mobile app on the user's mobile device. For instructions that an Authorized Contact can use to identify the SMR value assigned to your account, see the Identify Your Sky Mobility Router section of this article.
After installing and opening the app, when the "Connect for Mobile Would Like to Send You Notifications" pop-up message appears, tap the Allow button, and then tap the Continue button. You will also be asked to participate in a voluntary data collection program to help improve the performance of the app.
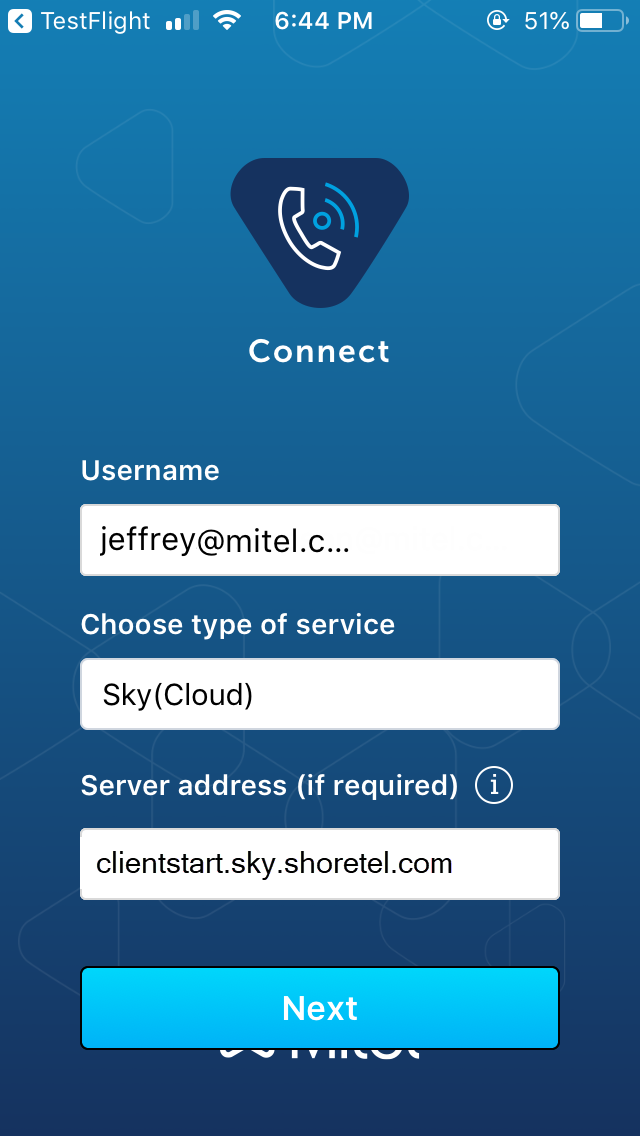
When the Connect for Mobile “Sign In” screen appears, use the following instructions:
- In the Username field, enter your 10-digit enterprise (business) phone number.
- Tap the Choose type of service field and select Sky (Cloud).
- Tap the Server address field and replace the default value (clientstart.sky.shoretel.com) by entering one of the following IP addresses depending on which SMR is assigned to your account. For instructions, see the Identify Your Sky Mobility Router section of this article.
- SMR1 = 10.10.105.100
- SMR2 = 10.60.33.233
- SMR3 = 10.60.33.234
- Tap Next.
- Tap the Enter your password field and enter the phone/voicemail PIN for your enterprise (business) phone number.
- Tap the Enter your mobile number field and enter your 10-digit mobile (personal) phone number.
- Tap Sign In.
- If the International Number Validation screen appears prompting you to use +1 with your mobile number, tap Yes if you want to make or receive international business calls over cellular voice or tap No if you do not.
- If the Remote Server Details screen appears, enter one of the following remote server addresses in the top field (depending on which SMR is assigned to your account), enter 443 in the bottom field, and tap Next.
- SMR3 = smr3.shoretelsky.com
- SMR2 = smr2.shoretelsky.com
- SMR1 = smr1.shoretelsky.com
- If the correct data was entered, tap OK when the Provisioning screen displays "This device has been successfully provisioned."
- When a series of "Connect for Mobile Would Like to ..." messages appear, make the desired selections (Allow/OK or Don't Allow) for enabling the Connect for Mobile app to access the Calendar, Contacts, and Microphone on your mobile device. You must select Allow/OK for access to the Microphone or the app will not be functional. You should also select Allow/OK for access to the Calendar and Contacts if you want to be able to use the app to join upcoming events scheduled in your calendar and search for contacts to call. To change your selections in the future, open Settings on your mobile device (not in the Connect for Mobile app), select Privacy, and select Contacts, Calendars, or Microphone to make the desired changes.
First Sign In Screen
Identify Your Sky Mobility Router
Using the instructions in the Provisioning section of this article requires that you know which SMR (Sky Mobility Router) is assigned to your company's account. To find out which router is used for your account, SMR1, SMR2, or SMR3, an Authorized Contact (Decision Maker or Phone Manager) for your account can do the following:
- Log into Account Portal with your business email address (username) and user password.
- Navigate to Phone System > Add-on Features.
- In the Add-on Features screen that appears, click Settings next to Sky Mobility.
- In the Mobility Settings screen that opens, make a note of which SMR# is used for your account's Mobility Router, as shown in the following image. (If the Mobility Settings screen displays an Error timeout message, navigate back to the Add-on Features screen and try step 3 again.)

NOTE: If you cannot access the above screen for any reason, you can create a Support Case to request the Mobility Router SMR# for your account from Support.
Activate Service
Authorized Contacts (Decision Makers and Phone Managers) can do the following to activate the Sky Mobility service in the Sky Account Portal.
- Log into Account Portal with your business email address (username) and user password
- Navigate to Phone System > Add-on Features.
- Click Activate next to Sky Mobility.
- The Settings dialog box opens displaying the following fields, most of which are visible and modifiable by only Support.
- Mobility Router - The Sky Mobility Router (SMR) assigned to your account.
- Group Name - The group name assigned to your account.
- Voicemail Access Number - The 10-digit phone number that you dial to access your business voicemail system.
- Access Number - An internal number used to process calls.
- Reverse Dial Number - An internal number used to process calls.
- Handover Number - An internal number used to process calls.
- Select the Send email notification checkbox to ensure that authorized personnel in your organization are notified whenever any of these settings are changed.
- Click OK to save the settings.
- Click OK again when asked to confirm the purchase of the Mobility license.
Manage Settings
Your organization's Sky Mobility service is built with default settings that are applied to every new user. Authorized Contacts (Decision Makers and Phone Managers) can utilize the instructions in the following Add Users, Enable Video, Send Provisioning Email, and Remove Users sections. Only Support is enabled to Edit Account Settings.
Note: The tabular formatted Mobility screen that appears after clicking the Manage button on the Add-on Features screen enables you to customize your view of data on the screen. To learn how to utilize this tabular screen, see the Tabular Formatted Screens article.
Edit Account Settings
To update the Account Settings for your Mobility service, a Decision Maker or Phone Manager can create a Support Case to communicate your request to Support. Note that changes to account settings are applied only to new users and do not impact existing user settings.
Add Users
Decision Makers and Phone Managers can use the following instructions to add users to their Sky Mobility service:
- Log in to Account Portal with business email address (username) and user password.
- Navigate to Phone System > Add-on Features.
- Click Manage next to Sky Mobility.
- In the Mobility screen that appears, click Add, which opens an Add Sky Mobility Users dialog box displaying a list of all inactive users.
- Search for the desired user(s) and select the check box next to the desired user name(s) that you want to activate.
- Click OK, then click OK again when asked to confirm the purchase of the Mobility license.
Enable Video
The "Video Mobility" feature has to be enabled by or for each user of your account's Sky Mobility service.
Note: An audio call can be changed to a video call, but only when both the caller and the called party (1) have the "Video Mobility" feature enabled and (2) are using the Connect for Mobile app in the same Sky phone system. The "Video Mobility" feature can be enabled or disabled by users and Authorized Contacts in the Features section of the Phone tab in the Phone Settings screen. To learn more, see the Video Mobility section of the Phone Features Settings article. Additionally, a Decision Maker or Phone Manager can create a Support Case to request that Support enable the "Video Mobility" feature at the account-level (for all current and future users).
Decision Makers and Phone Managers can use the following instructions to enable or disable the "Video Mobility" feature for any user.
- Log into Account Portal with your business email address (username) and user password.
- Navigate to Phone System > Add-on Features.
- Click Manage next to Sky Mobility.
- In the Mobility screen that appears, find the desired user.
- If a checkmark appears in the Video column for that user, the Video feature is enabled, otherwise, it is not.
- To enable or disable the Video feature, right-click the row of the desired user, select the Update Sky Mobility option, and in the Edit Sky Mobility Settings dialog that opens, select or deselect the Enable Video check box.
- Click OK to save the change.
Note: For information about using the Video feature, see the Usage Instructions in the Using Sky Mobility article.
As a Decision Maker or Phone Manager, you can send a new user of the Sky Mobility service a link to this Sky Mobility article via the "Send Provisioning Email" option by using the following instructions.
- Log into Account Portal with your business email address (username) and user password.
- Navigate to Phone System > Add-on Features.
- Click Manage next to Sky Mobility.
- In the Mobility screen that appears, which displays a list of active users, to find the desired user, you can filter your view of data displayed on the screen by doing the following:
- Users - To find a specific user, type search criteria in the Name and Phone Number columns, and sort users by clicking any of the column headings.
- Locations - To view users from a particular location, select the desired address from the "All locations" drop-down menu (located above the toolbar).
- When you find the desired user, right-click anywhere in the row of the user and click the Send Provisioning Email option to send the user a link to this article. This feature uses the selected user's business email address (as listed in the user's Personal Information screen).
- Click OK to confirm.
Authorized Contacts - Use the following instructions to remove users from your Sky Mobility service.
- Log into Account Portal with business email address (username) and user password.
- Navigate to Phone System > Add-on Features.
- Click Manage next to Sky Mobility.
- In the Mobility screen that appears, which displays a list of active users, search by Name and Phone Number for a desired user.
You can also sort users by clicking any of the column headings. - When you find the desired user, right-click anywhere in the row of the user.
- Select the Disable Sky Mobility option to remove the user from the service.
- Click OK to confirm the delete.

