Sky for Salesforce v5.0 is a suite of CTI (Computer Telephony Integration) services that integrates the Sky phone system with Salesforce.com to serve the Salesforce customer community.
Table of Contents
Features
Requirements
Activate and Add Service
Edit User Settings
Deactivate Users
Best Practices
FAQs
Known Issues
Troubleshooting
Learning Resources
- Data Migration Guide
- User Guide
- Screen Captures
Related Topics
Features
Supported Features
The Sky for Salesforce v5.0 includes:
Cloud CTI Widget
Sky for Salesforce v5.0 includes a CTI (Computer Telephony Integration) widget that provides parity and enhanced features.
-
Parity features include: Click-to-Dial, Answer, Ignore, Hold/Resume, Screen Pops, Activity Tracking and Recent Calls
-
Enhanced features include: Better Multi-line Handling, Missed Call Tracking, Notes Capture, and Warm Transfer
Unsupported Features
Requirements
- A Sky phone number for each user
- A Managed (IP phone) profile for each user
- Salesforce Professional, Enterprise, or Unlimited Edition
- All three of the following Salesforce Clouds:
- A supported browser:
- Chrome (most recent version)
- Firefox 16 or higher
- Internet Explorer 8 or higher
- Safari (most recent version)
- Installation of the Sky Platform Managed Application
The following sections provide more detailed information about Sky for Salesforce.
Activate and Add Service
Authorized Contacts (Decision Makers and Phone Managers) with Salesforce.com credentials can do the following:
- Log into the Account Portal at https://portal.shoretelsky.com/ with their username (typically your email address) and user password.
- Navigate to Phone System > Add-on Features
- In the Add-on Features screen that appears, click the Activate button next to Sky for Salesforce.
- Note: If you do not see the Activate button or your Salesforce account has changed since this feature was originally Activated, click the Settings button, click the "Authenticate with Salesforce" link in the “API for Salesforce” dialog that opens, and follow the prompts to authenticate using your Salesforce.com credentials.
After performing the Activate Service steps above, continue with the Add Users instructions below to add all of the users you want added to the Sky for Salesforce service. This section of the article includes the following topics:
- Add Users
- Contact Support
- Install Sky Platform Packages
- Configure Call Center
- Add Call Center Users
- Salesforce Application Login
Add Users
After your service is activated, Authorized Contacts can use the following to add users to your Sky for Salesforce service:
- Log into the Account Portal at https://portal.shoretelsky.com/ with their username (typically your email address) and user password.
- Navigate to Phone System > Add-on Features
- In the Add-on Features screen that appears, click the Manage button next to Sky for Salesforce.
- In the Sky Salesforce screen, click the Add button, which opens the Add Sky for Salesforce Users wizard displaying a list of all inactive users in the Select Users panel.
- Search for the desired user(s) and select the check box(es) next each desired user's name.
- Click Next, which opens the Summary panel displaying a summary of the user's being added by location. The Summary panel shows Location, Services Ordered (shows "API for Salesforce"), Quantity, MRC (Monthly Recurring Charges), and NRC (Non-Recurring Charges). If there are multiple users for a location, divide the number of users (Quantity) into the MRC and NRC to see the per user charges.
- Review the information and click Finish, which displays a confirmation message indicating that Sky for Salesforce has been activated for the selected profiles. If changes are needed, click the Back button to make changes, then click Next to return to the Summary panel.
Contact Support
After reviewing the application requirements and performing the Activate Service and Add Users steps above, create a Support Case to contact Support to complete your Sky for Salesforce activation and installation. This requires installing the required Managed Packages and configuring the desired Salesforce users.
If for any reason you are not able to perform the Add Users steps, you need to provide Support with the names of all of the Salesforce users (who have a Managed Profile in the Sky phone system) that you want added to your Sky for Salesforce service.
After contacting Support, you will be provided with links to the "Sky Platform Packages" and "Call Center Definition" files.
Install Sky Platform Packages
- Copy the Sky Platform Packages link that you received from Support into your browser's address bar. This requires your Salesforce administrator to be logged in (otherwise an unauthorized error may occur).
- Note: If installing Salesforce in a sandbox environment, replace “login” in the URL with the string from your environment.
- Follow the on-screen prompts to complete the package installation.
- On the “Choose Security Level” screen, it is very important to select the Grant Access to All Users option.
- Note: This does not automatically give users access to the app, but rather allows the app to be added to a user's profile after one of the later steps.
- Complete the on screen prompts and the package will complete installing. Please note the following:
- If you receive a failure notification stating “Custom Tab Limit Exceeded,” you may need to contact Salesforce to obtain additional Custom Tabs.
- If you receive a generic error message, it may be the result of missing one or more of the required Salesforce clouds. See the Requirements section of this article.
Configure Call Center
- Click the link to the Call Center Definition File that you received from Support and save the file to your desktop.
- Have your Salesforce administrator log into Salesforce. Look for this person's own username located near the top-right corner of any screen in Salesforce.
- Click the username and then select the Setup option (below My Settings) in the drop-down menu that opens.
- In the "Quick Find / Search" box located near the top-left corner of the interface, type "Call Center" and select the "Call Centers" option within the App Setup area as shown in the following image:
- If you are presented with an "Introducing Salesforce CRM Call Center" page that provides a basic explanation of Salesforce Call Centers, click the Continue button in the bottom left-corner of the screen.
- In the next screen (All Call Centers) that appears, click the Import button on the right side of the screen.
- In the Call Center Import screen that appears, click the Choose File button next to "Choose Call Center Definition File."
- Browse for the Call Center Definition File that was saved to the desktop in step 1 above. This file should have a name that is similar to the following: callCenterDefinitionFile50.xml
- Click the Import button (next to the Cancel button).
- In the Call Center Detail screen that appears, review the default settings.
- Note: If your organization's Sky phone system utilizes an outbound dial digit other than 9, you will need to edit the Outside Prefix to match the outbound dial digit that your organization utilizes.
Add Call Center Users
- From the Settings page of the Call Center (normally labeled as “ShoreTelSky for Salesforce”), select the Manage Call Center Users button.
- In the next screen that appears, click the Add More Users button.
- In the next screen that appears, to find Salesforce users to add to the Sky for Salesforce application, use the drop-down menus and input boxes to enter search criteria and then click the Find button.
- Notes:
- It is sometimes easier to search by roles to avoid having to search for users individually.
- If a user is already part of another Call Center, you will be unable to add them to a second.
- When you find one or more desired users, select the check box to the left of each desired user’s name and click the Add to Call Center button. The following image shows an example of the All Call Centers > ShoreTel Sky for Salesforce screen:
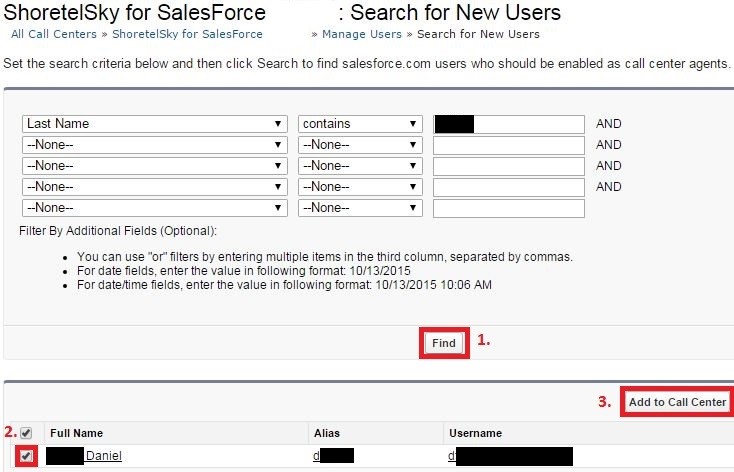
- If you need to remove a user, click the remove button next to that user's name.
Salesforce Application Login
The ShoreTel Sky for Salesforce application log in widget will now appear for the users added to the application. If a user appears without their Managed Profile DID under Phone Number, or a different number appears, the user will have to proceed to their My Settings > Personal > Personal Information screen, which is accessible via the menu under the user's profile name in Salesforce. Ensure that the “phone number” field matches the user's 10-digit phone number in the Sky phone system.
Edit User Settings
Only Support has the ability to edit individual user settings for your ShoreTel Sky for Salesforce service. However, Authorized Contacts can use the following instructions to search for individual users of the service.
- Log into the Account Portal at https://portal.shoretelsky.com/ with their username (typically their email address) and user password.
- Navigate to Phone System > Add-on Features
- In the Add-on Features screen that appears, click the Manage button next to Sky for Salesforce.
- In the Sky Salesforce screen that opens, which displays a list of active users, to find the desired user, you can filter your view of data displayed on the screen by doing the following:
- Users - To find a specific user, type search criteria in the Name, Number, and Integrated Add-on Services columns, and sort users by clicking any of the column headings.
- Locations - To view users from a particular location, select the desired address from the "All locations" drop-down menu (located above the toolbar).
Deactivate Users
Authorized Contacts can use the following to deactivate users from your Sky for Salesforce service:
- Log into the Account Portal at https://portal.shoretelsky.com/ with your phone number and complex password or username (typically your email address) and user password.
- Navigate to Phone System > Add-on Features
- In the Add-on Features screen that appears, click the Manage button next to Sky for Salesforce.
- In the Sky Salesforce screen that opens, which displays a list of active users, search by Name, Phone Number, Integrated Add-on Services, and Status for a desired user.
- You can also sort users by clicking any of the column headings.
- When you find the desired user, right-click anywhere within the row and select Disable Sky for Salesforce to remove the user from this service.
- Click Yes to confirm deactivating the user.
Note: For the Add Users and Deactivate Users sections of this article, when viewing the Sky Salesforce screen that appears after clicking the Manage button on the Add-on Features screen, the tabular formatted screen that opens enables you to customize your view of data. You can drag columns to different locations, change column width, and right-click within the column headings area to make selections to show or hide any of the columns of data that are displayed on the screen. Additionally, tabular formatted screens provide a "Multiple values search" field.
Best Practices
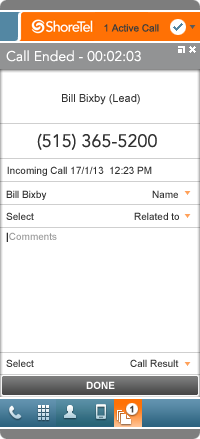
Click "DONE" to Save the Details of each Call
- After each call is completed, before handling another call, click the “DONE” button in the CTI widget. This ensures that the details of the call are properly recorded in the application.
Click "Name" menu to Select the Correct Contact
- When a call matches multiple contacts, be sure to select the correct contact using the “Name” drop-down menu in the CTI widget. This ensures that the call record is associated with the correct contact in Salesforce.
Browser Tab Management
- Limit the number of open browser tabs while using the Sky for Salesforce application. Each open browser tab executes another instance of the CTI widget, which can result in decreased response time in the user interface.
- When possible, do not switch tabs while engaged on an active call in the CTI widget. However, when switching tabs does occur, make sure the correct contact name is selected in the "Name" drop-down menu before clicking the "DONE" button. This ensures that the call record is associated with the correct contact in Salesforce.
FAQs
Q: Can I use Sky Mobility with Sky for Salesforce?
A: No, Mobility and other SIP-based software devices do not have the call control and logging capabilities that are required for Sky for Salesforce.
Q: Is the use of Shared Line Appearances (SLA) supported with Sky for Salesforce?
A: No, Shared Lines are not supported in Salesforce. When an SLA call is placed on hold via the CTI widget, and when a phone is used to place an SLA call on hold, the call disappears from the CTI widget. Note that Shared Line Appearances (SLA) are also known as Shared Call Appearances (SCA) and Bridged Line Appearances (BLA) in other phone systems.
Q: What are the requirements for Sky for Salesforce?
A: See the Requirements and Prerequisites section at the end of this article.
Q: Why do I see missed call tasks logged in Salesforce when I miss a call that came in through a ring group and was picked up by another user?
A: The Sky for Salesforce application cannot identify the original source of a call when the call is processed by a Ring Group (a.k.a., Hunt Group). Therefore, all inbound calls that are received via a Ring Group are logged as a Missed Call task within Salesforce for all members of the Ring Group who did not answer the call. Only the user who answered the call will show an Inbound Call task in Salesforce.
Q: Can I install Sky for Salesforce if our organization is already using another "dialer" application within Salesforce.com?
A: No. To successfully install Sky for Salesforce, you must first uninstall any previously installed "dialer" applications that integrate with your Salesforce.com account.
Q: Can I use the Safari browser with Sky for Salesforce?
A: Yes. To utilize the Safari browser when using the Sky for Salesforce CTI widget, you need to go to the Safari browser's Settings panel, select the Privacy tab, and change the "Block cookies" setting to "Never" (the default setting blocks cookies from third parties).
Q: Which 'What' objects can be used to relate a call from the CTI widget?
A: Account, Case, Campaign, and Opportunity objects.
Q: What editions of Salesforce are supported?
A: Sky supports Professional, Enterprise and Unlimited Editions.
Q: Which Salesforce Clouds are required to install the Sky for Salesforce "Managed Package"?
A: Sky for Salesforce requires a customer to have all three Salesforce Clouds: Sales, Service, and Marketing.
Q: Why am I maxed out on the custom fields for the Activity (Task) object with our existing Sky for Salesforce "Managed Package"?
A: It is critical that at least 2 custom fields are available when installing Sky for Salesforce v5.0.
- Activity (Task) has a limit of 3 External fields
- Old managed package uses 2 External fields
- New managed package uses 1 External fields
- When the new managed package is installed, if this exceeds the limit of 3 External fields (because you have other custom fields that are External), the managed package installation will fail
- You may need to delete other custom fields or uninstall the old package first, which will delete old Task fields
- Please note it is critical to run data migration scripts prior to taking this action
Q: Does Sky support Console View?
A: No, Sky does not support full functionality of the Console View. While the CTI works, the "Related To" functionality does not work.
Known Issues and Limitations
Sky Business SMS, and Scribe are no longer supported within Sky for Salesforce.
Troubleshooting
If you have a Salesforce.com user account, but cannot log into the Sky for Salesforce CTI widget because your phone number does not appear on the login screen, do the following:
- Log into Salesforce.com and search for your name.
- When a match is found, click the link for your user profile name.
- Locate your Contact information.
- Edit the contact information to include your Sky phone number.
- Save the changes to your contact information, and try again to log into the Sky for Salesforce CTI widget.
Learning Resources
The following sections provide resources for learning more about Sky for Salesforce.
Data Migration Guide
When migrating from the 'Sky' (or 'M5Connect') packages to the 'Skyplatform' and (optionally) 'Skyenterprise' packages, it is necessary to run Apex scripts to migrate data to the new packages. Several Apex scripts should be executed, depending on the migration path.
Click Running Salesforce Data Migration Scripts to view and download this PDF file.
User Guide
Click ShoreTel Sky for Salesforce User Guide to view and download this PDF file.
Screen Captures
The following are the main feature panels of the Sky for Salesforce application.
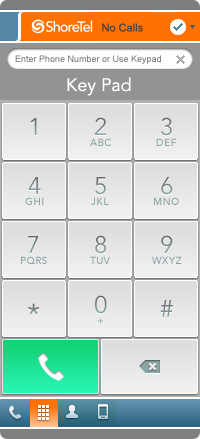
Key Pad panel
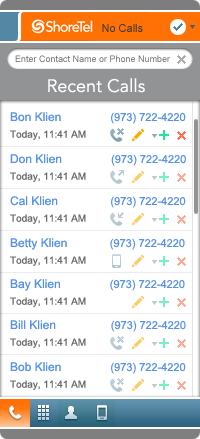
Recent Calls panel
People panel

Call Panel
Related Topics
Opening a Support Case
Sky Account Portal
MiCloud and Sky Support
Authorized Contacts
Add-on Features
Application Integration Solutions

