This article is for system administrators who use Director to manage their ST14.2 (GA8 build 19.43.7902.0 and greater) phone system. The instructions in this article are designed to help system administrators create new HYBRID accounts and provision the following cloud-based services for the users in their organization:
- HYBRID Scribe (for ST14.2) - Transcribes voicemail from your phone into text and then sends it, along with a WAV audio file, to the email address of your choice.
- HYBRID Fax (for ST14.2) - An email-to-fax service used as a fax solution for the phone system enabling users to receive incoming faxes in their email inbox and send outbound faxes as email attachments.
Table of Contents
Requirements
Access HYBRID Services in Director
HYBRID Registration
Registration Welcome Email
Access to HYBRID Credentials in MiCloud Account Portal
Sync Users from Director to Account Portal
MiCloud Account Portal Access
Activate HYBRID Services in Account Portal
Verify Users Synced from Director to Account Portal
Account Maintenance
Manage Users of HYBRID Services in Account Portal
Requirements
- HYBRID 1.0 is enabled and supported for new customers using ST14.2 GA8 build 19.43.7902.0 and greater
- To effectively enable users for any of the HYBRID services, each user must have a unique, valid email address, and an assigned DID telephone number (or trunk group that is assigned a DID range of telephone numbers). Otherwise, it is not possible to synchronize data between Director and the Account Portal.
- To ensure that the HYBRID Scribe service is compatible with the settings in Director, for each user, log into Director and navigate to Administration > Users > Personal Options > Escalation Profiles and Other Mailbox Options, verify that a valid Email Address is specified, and set Deliver Message as Email to "Attach Wav File" (not "Disabled").
- See the HYBRID Enablement Guide to view and download a PDF containing useful information about enabling and troubleshooting HYBRID services.
- See the HYBRID Version 1.0 Release Notes to view and download a PDF containing requirements and additional information for each of the HYBRID services.
Access HYBRID Services in Director
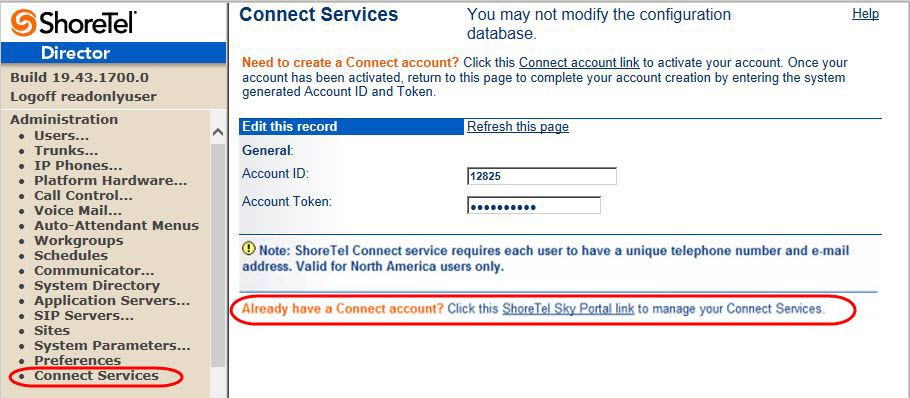
In Director, an Onsite (Premise) system administrator (or other authorized person) selects the HYBRID Services link in the Administration menu, then clicks the "Connect account link," circled in red in the following image, to access the HYBRID registration screen in the MiCloud Account Portal to create a new HYBRID account.
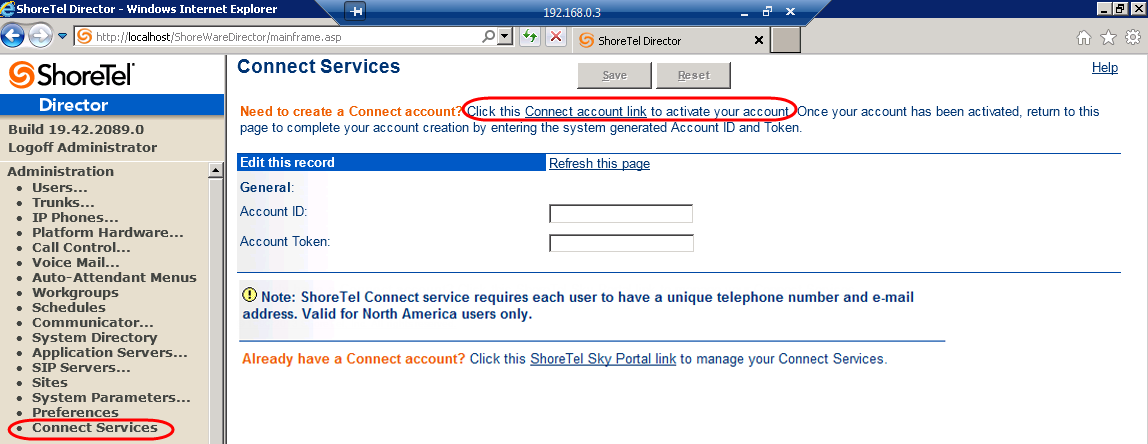
Note: The system administrator will return to the HYBRID Services screen after registering for HYBRID services to continue with the provisioning process. If the system administrator needs to authorize another person to manage a HYBRID account, see the HYBRID Authorized Contact article.
HYBRID Registration
In the Account Portal Connect registration screen shown in the following image, the system administrator enters information into all required fields to register for HYBRID services.
NOTE: The requirements for a new HYBRID account include providing a unique Company Name and a unique, valid Business Email address. If the Company Name is already being used by another HYBRID account, just append some text, such as a location, to make the Company Name unique.
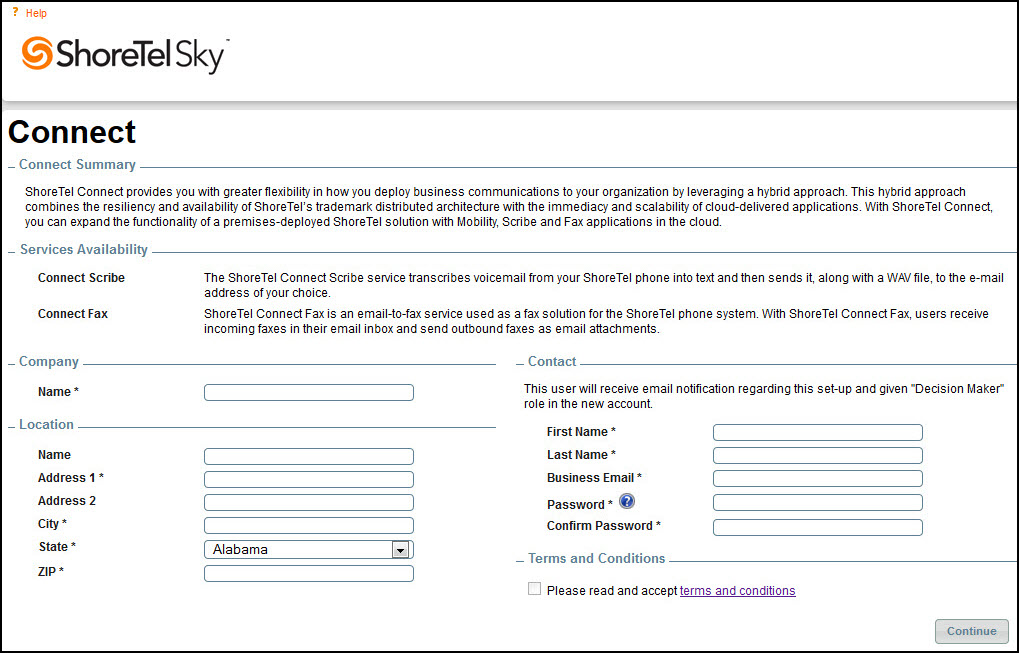
The information entered in the Contact section of the HYBRID registration screen will be used to create a Decision Maker, which is a type of Authorized Contact, for the newly created HYBRID account. This Decision Maker is usually the system administrator who manages users in Director, but could be another trusted person in an organization.
If any of the required fields on the Account Portal Connect registration screen are not populated, the system administrator is alerted to provide the missing information, as shown in the following image.
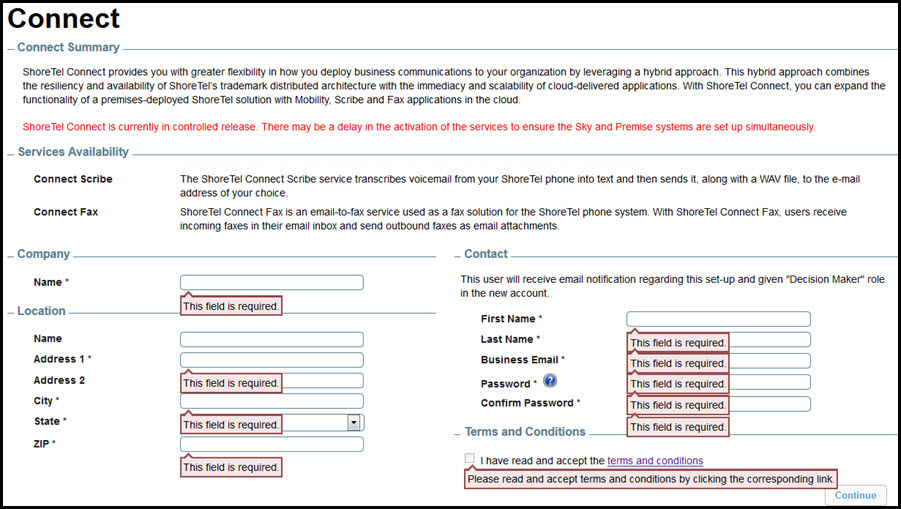
Click the "terms and conditions" link, which opens the End User Terms of Service document. Note that the Terms and Conditions check box is disabled until the link is clicked.
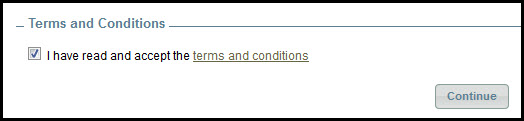
To complete the registration process, select the Terms and Conditions check box, then click the Continue button as shown in the following image:
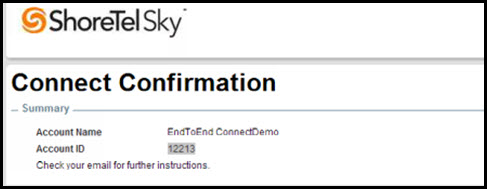
In the Confirmation screen that appears, as shown in the following image, the Account Name and Account ID are displayed with a note to "Check your email for further instructions."
Registration Welcome Email
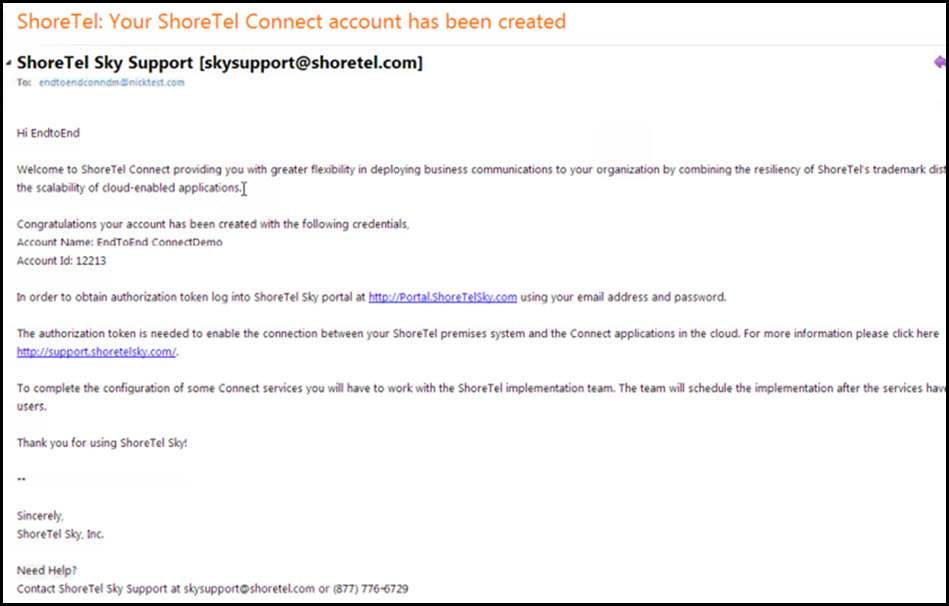
A welcome email is sent to the Business Email address entered in the registration screen. This email contains the Account Name, Account ID, and additional instructions. The Account ID, plus an authorization Token, are required to synchronize user data stored in Director with the Account Portal. The following image is an example of a welcome email. The actual email may be somewhat different.
Access to Credentials in MiCloud Account Portal
To obtain the necessary log in credentials to access the Account Portal, the system administrator can do either of the following:
- Click the Account Portal link in the welcome email.
- Return to Director, click the Connect Services link in the Administration menu, and click the ShoreTel Sky Portal link shown in the following image.
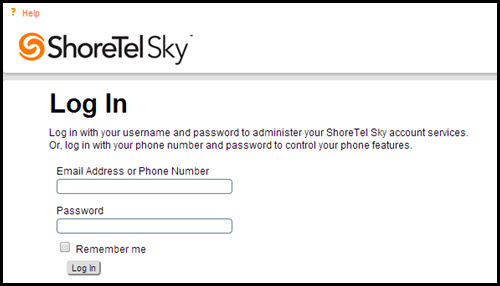
At the Log In screen shown in the following image, use the Business Email and Password (that were entered when the system administrator registered in the registration screen) to log into the Account Portal.
After successfully logging into the Account Portal, the Account Details screen opens displaying account related information for the newly created HYBRID account. If the Account Details screen does not appear or if you navigate away from this screen, navigate to Organization > Account > Account Details.
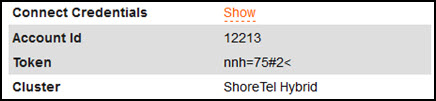
To access the authorization Token required for syncing users from Director to the Account Portal, click the "Show" link to the right of Credentials in the top-center panel of the Account Details screen, as shown in the following image:
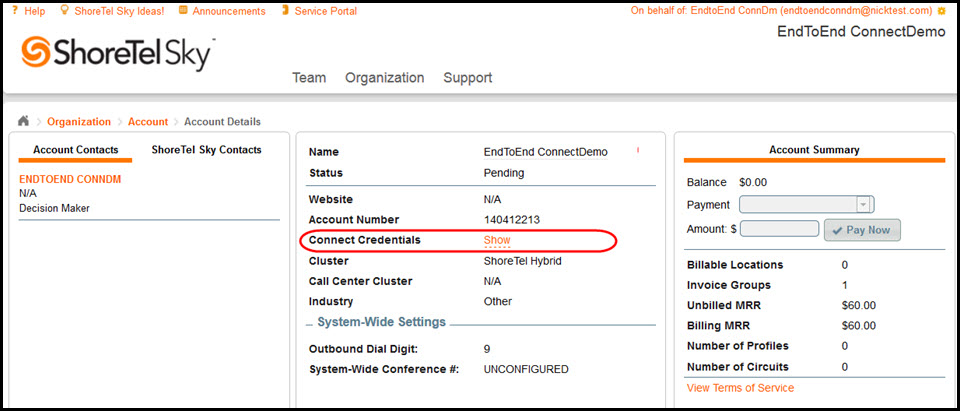
Clicking the Show link reveals two hidden fields (below Credentials) showing the Account Id and Token. These two fields are required to synchronize (import) user data from Director into the Account Portal.
Note: Only a MiCloud Decision Maker is enabled to click the Show link to view the Token in the Account Details screen. Support members will not be able to view this authorization Token.
Sync Users from Director to Account Portal
The Connect Services "sync" process takes user profile data that is stored in Director and imports the data into the Account Portal where HYBRID Services are managed. After valid credentials are entered in Director and the sync process is successfully initiated, the syncing of data becomes an automated process that regularly syncs user data changes. The default processing times are approx. every 5 minutes for user data changes and approx. every 8 hours for service activation changes.
To initiate the process of syncing user data stored in Director with the Account Portal, the Onsite (Premise) system administrator should do the following:
- Log into Director
- Select HYBRID Services in the Administration menu
- In the HYBRID Services screen that opens, enter the Account ID and Token (in the Account Token field)
- NOTE: There is no immediate indication on this screen to show that the Account ID and Account Token were processed successfully or unsuccessfully.
To verify that the Account ID and Account Token entered in the HYBRID Services screen were validated successfully, and to verify the success of the Connect Sync process, do the following:
- Select Quick Look in the Maintenance menu of Director
- In the Quick Look screen that opens, find the Server/Appliance area on the right side of the screen and click the Headquarters link, which is circled in red as shown in the following image:
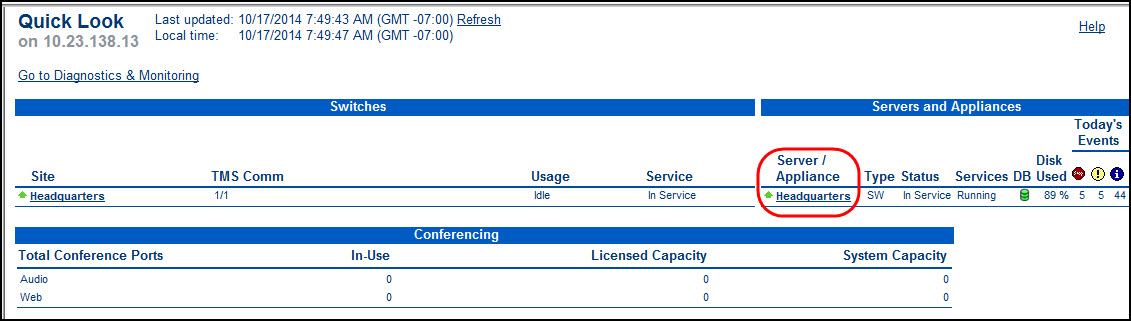
- In the Main Server Maintenance screen that opens, as shown in the following image, do the following:
- In the Status area of the screen:
- If the indicator to the left of Connect Token is green and the status to the right shows OK, the Account ID and Account Token were accepted by the Account Portal and user data synchronization should process successfully.
- If the indicator to the left of Connect Token is red and the status shows "Invalid Login," the copy and paste of the Account Token may have introduced an extra space and the login credentials should be carefully re-entered. If you need help resolving this issue, see the Copy-Paste Token Error section of the HYBRID Services Troubleshooting (for ST14.2) article.
- In the Services area of the screen:
- If the indicator to the left of Connect Sync is green and the status to the right does not show an error message, user data was successfully synced (imported) into the ShoreTel Sky Portal.
- If the indicator to the left of Connect Sync is red and the status to the right shows an error or "unknown" message, user data was not synced (imported) into the Account Portal. To resolve errors with the sync process, see the HYBRID Services Troubleshooting (for ST14.2) article.

To view more detailed Connect Sync information including user-level data and account-level statistics (number of users in Synced, Failed, Ready to Sync, and Not Eligible status), do the following:
-
Access detailed Connect Sync information via any of the following:
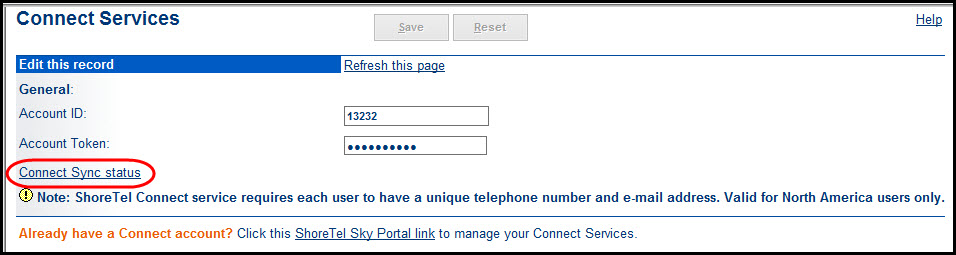
- Connect Services - Select Connect Services in the Administration menu of Director, then click the "Connect Sync status" link shown in the following image:
- Diagnostics & Monitoring
- Select Diagnostics & Monitoring in the Maintenance menu of Director
- Note that you can also click the "Go to Diagnostics & Monitoring" link in the Quick Look screen
- In the Diagnostics & Monitoring dialog that appears, click Status (under Topology) and select Connect Sync
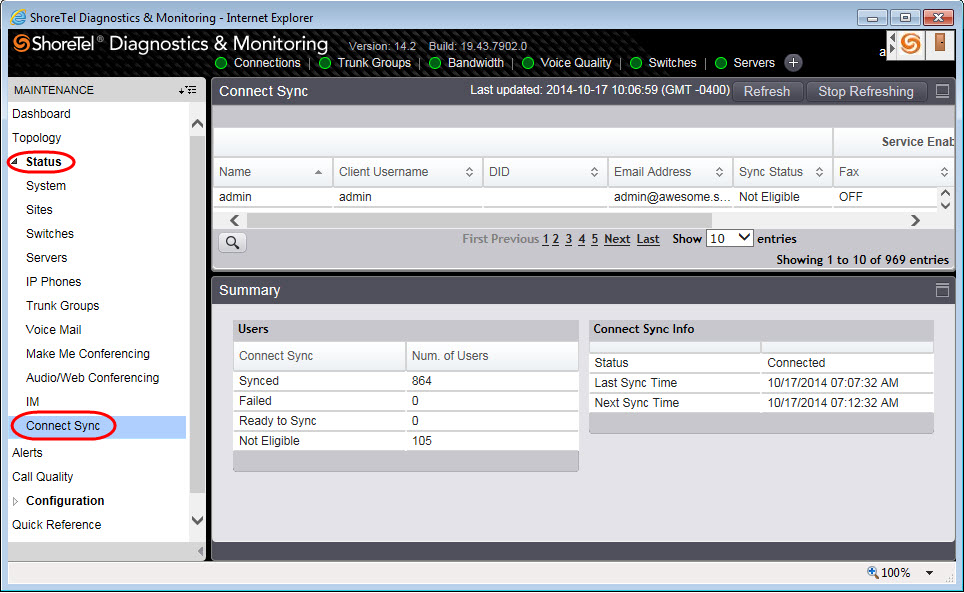
- Find user-level data in the Connect Sync panel and account-level statistics in the Summary panel as shown in the following image:
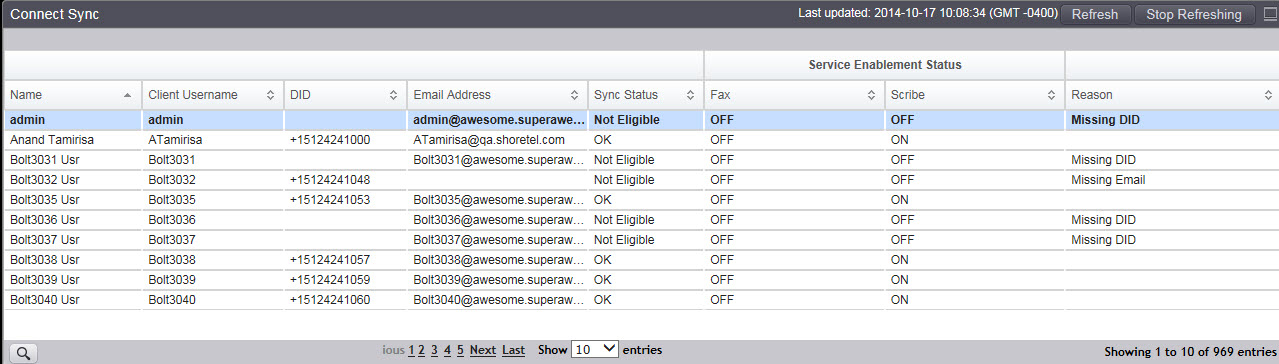
The following image shows a more detailed view of the Connect Sync panel, when you expand the Diagnostics & Monitoring dialog to full-screen mode, which includes each user's enablement status for each service:
To review the users being synced from Director to the Account Portal, from the Administration menu in Director, navigate to Users and select Individual Users. As needed, click the desired link in the First Name column to ensure that the Requirements are met for that user.
The user data that is synced and viewable in the Account Portal includes Name, Email, and Fax Number and/or Phone Number
To resolve any issues with syncing user data stored in Director with the Account Portal, see the HYBRID Enablement Guide first, then use the HYBRID Services Troubleshooting (for ST 14.2) article.
Account Portal Access
After all of the user data for a HYBRID account is successfully synced (imported) into the Account Portal from Director, the Decision Maker will log into https://portal.shoretelsky.com with business email address (username) and password, and navigate to Phone System > Add-on Features to access HYBRID services. Managing HYBRID services provides access to the Phone System, Organization, and Support menus, which are shown below:
Phone System Menu

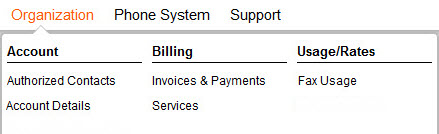
Organization Menu
Support Menu
Provides access to Trust and Knowledge Base.
The Account Portal screens that are accessible are listed below:
Activate MiCloud Services in Account Portal
To activate any of the HYBRID services, an Authorized Contact (Decision Maker or Phone Manager) does the following:
- Navigate to Phone System > Add-on Features
- Click the Activate button next to the desired service
The available services displayed on the Add-on Features screen are HYBRID Scribe and HYBRID Fax. After a service has been activated, the Activate button is replaced by the Settings and Manage buttons. For each activated HYBRID service, the Manage button opens a screen where the users and settings for that service can be managed. The following image shows both the Scribe and Fax services as being activated.
Verify Users Synced from Director to Account Portal
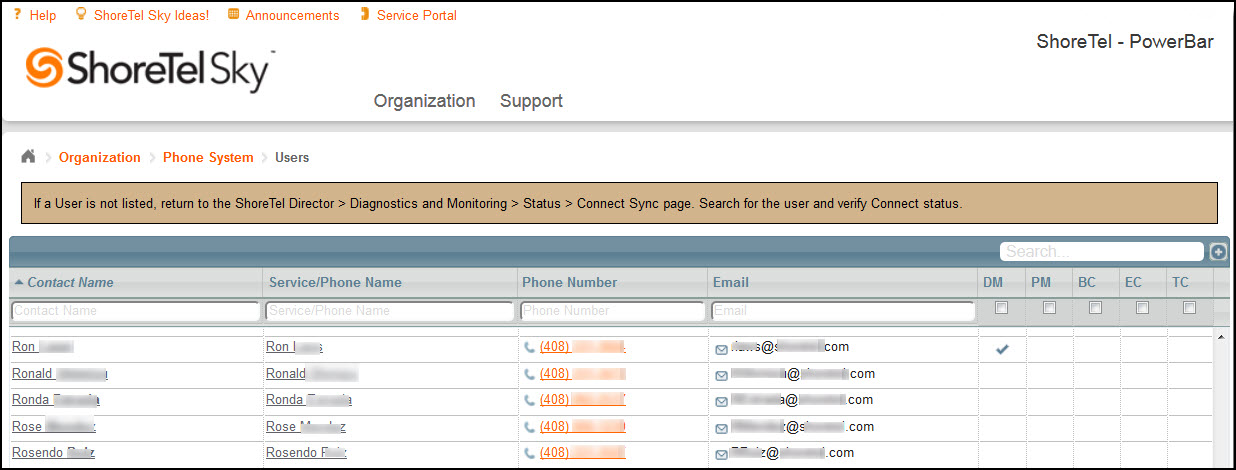
To verify that all of the users for an account are successfully synced from Director to the Account Portal, log into the Account Portal with email address and password, and navigate to Phone System > Users. The Decision Maker for the account, and the users who were imported from Director, are displayed on the Users screen.
An Authorized Contact (Decision Maker or Phone Manager), usually the system administrator who manages users in Director, should NEVER make changes to user data in the Account Portal. Continue to add, change, and remove users in Director as usual, and the changes will be synced with the Account Portal.
As described previously in this article, when a system administrator registers on the registration screen to create a new HYBRID account, the information entered in the Contact section of the registration screen is used to create a "Decision Maker" for the account. A "Decision Maker" is indicated by a check mark in the DM column of the Users screen, shown in the image below.
Account Maintenance in Director
All account maintenance must be performed in Director, and the changes are automatically synced to the Account Portal. This includes adding new users, deleting existing users, and updating any user information (name, phone number, email address, etc.). Note that user data is synced in only one direction; from Director to the Account Portal. The only data that can be changed in the Account Portal is the username and password used to log into the Account Portal. Do NOT make any changes to any other user data in the Account Portal to avoid creating an out-of-sync condition. To review syncing instructions, see the Sync Users from Director to Account Portal section of this article.
Manage Users of HYBRID Services in Account Portal
If someone other than the original Decision Maker for a HYBRID account needs to be authorized to manage the services and users in the Account Portal, an existing user can be granted "Authorized Contact" permissions. For more information see the HYBRID Authorized Contact (for ST 14.2) article.
An Authorized Contact (Decision Maker or Phone Manager) for a HYBRID account can manage all aspects of individual HYBRID services directly in the Account Portal by doing the following:
- Log into https://portal.shoretelsky.com with email address (username) and user password
- Navigate to Phone System > Add-on Features
- Click the Manage button next to an activated HYBRID service
- From the screen that opens, the following options are available depending on the selected service:
- Add users - Click the Add button to open a wizard to add existing users in the account to become a new user of the selected service.
- Disable users
- HYBRID Scribe - Right-click within the row of a selected user and select the Disable Hybrid Scribe link
- HYBRID Fax - Right-click within the row of a selected user and select the Disable Fax Number option (to disable the fax number listed next to the selected user) or Disable User option (to disable all fax numbers, if multiple fax numbers were assigned to the user)
- Update users
- HYBRID Scribe - Right-click within the row of a selected user and select the Update Hybrid Scribe link
- HYBRID Fax - Right-click within the row of a selected user and select the Edit Fax User Settings option
To access specific instructions for managing account settings and users for each HYBRID service, use the links below:
To access information and instructions for assigning Authorized Contact roles to existing users, use the link below:
To access information and troubleshooting instructions for the HYBRID Services sync process, use the link below:
To investigate an issue with any HYBRID service, use the links below:

