Firmware Upgrade via Live CD
The Cisco IP phones listed in the Supported Phones and Devices article require a certain firmware version to connect properly to the Sky phone system. Most phones will properly upgrade to the correct firmware by entering the appropriate TFTP address into the network configuration. In some instances, phones may not be able to automatically change firmware.
This article explains how to create a "Live CD" which will enable you to run a local TFTP server on your computer to which your phones can be connected. With a "Live CD," you can run a local TFTP server to handle the firmware upgrades rather than having to ship the phones back and forth to the Sky Support offices.
Please note that upgrading firmware via a Live CD is not supported for 400-series and Cisco Conference Station 7937G IP phones.
NOTE: It is highly recommended that this process be performed by a member of your organization's IT department or by an IT consultant.
Requirements
Step 1: Create the Firmware Reset Media
Use one of the following links to download the ISO (disc image data).
Perform one of the following:
- Create a bootable CD or DVD. (See the Live CD wiki page for background information if desired.)
- Create a bootable USB (Linux Live USB is a program typically used for this process. See the Linux Live USB site for instructions if desired.)
Step 2: Running the Program
- Make sure that the computer that is being used is disconnected from both the Internet and your Network.
- Insert the firmware media and boot using the selected medium (CD, DVD, or USB).
NOTE: Some newer computers pre-configured with Windows 8 will not allow the Live CD to load appropriately. If you experience this issue please try on another computer. - Accept the terms to continue. If you do not agree, then the computer will auto-boot into the operating system.
Step 3: Connecting the Cisco Phone(s)
The next screen that is displayed contains the instructions for connecting your Cisco phone, as shown in the following image:
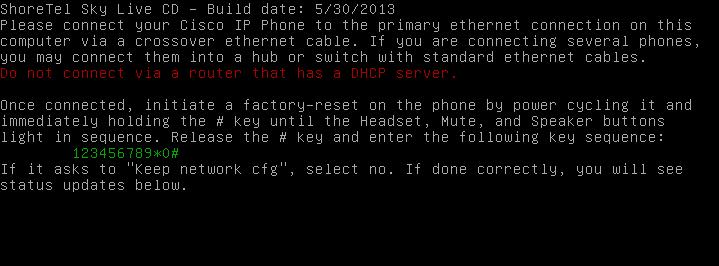
- If one phone is being flashed, connect into the phone's 10/100 SW port using a Cross-Over cable. Then connect into the computer that is running the firmware update program.
- If multiple phones are being flashed, connect the computer to a switch or a hub using a Straight Through (standard, non-cross-over) network cable, and also connect the switch to each phone using a Straight Through (standard, non-cross-over) network cable. You must use a switch or a hub, a router will not work correctly.
- If you do not have a Cross-Over cable, one phone can be flashed using a switch or hub Straight Through (standard, non-cross-over) network cable.
NOTE: Ensure that each phone has a power supply.
Initiate the factory reset on the phone by using the specified key sequence for that phone model.
The firmware update program will recognize when the phone asks for firmware and display the information about each phone.
Step 4: Finishing the Flash and Testing
The screen shown in the following image displays after each phone has completed receiving the needed firmware from the computer:
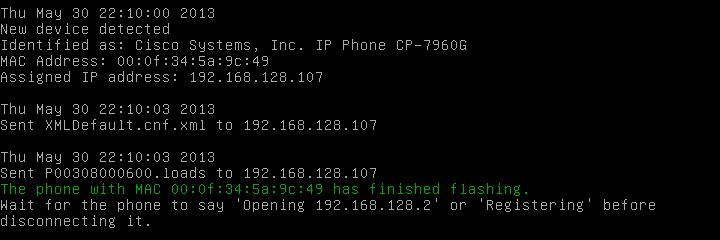
IMPORTANT: After the message shown above has been displayed, wait for the phone to finish installing the firmware before disconnecting from the computer or switch.
After this step is completed, connect the phone to the network, change the TFTP to the correct IP address, and log in using the proper credentials.

