NetSuite Inc. is a leading vendor of cloud computing business management software suites. The Sky for NetSuite application completes the picture of an integrated enterprise by seamlessly joining NetSuite and the Sky phone system for optimal information management and productivity. Integrated telephony features, once only available in the call center, are now accessible to the entire enterprise.
- NOTE: No further enhancements will be made to the Sky for NetSuite integration, which is an Internet Explorer web browser-based Java App (running Java 1.6+). However, the NetSuite Integration (MiCloud) for MiCloud, which is based on a Windows thick client, will continue to be enhanced in the future.
Table of Contents
Features
Requirements
Installation
Manage Users
Use
Known Issues
Related Topics
Features
- Click-to-Dial: Phone numbers throughout NetSuite become clickable for efficient, error-free dialing.
- Screen-Pops: Incoming calls are automatically matched to existing NetSuite Contacts.
- Call Control: Calls can be placed on hold or transferred from within NetSuite.
- Call Notes: Take notes directly in the NetSuite Adapter, conveniently embedded into NetSuite.
- Wrap-up Codes: Assign user-defined wrap-up codes to inbound, outbound or campaign-related phone calls after each call handled within NetSuite.
- Call Logs: All connected inbound and outbound calls are time-stamped and logged within NetSuite.
- Real Time Analytics - Measure sales, support and operational success.
Requirements
- NetSuite service
- NetSuite administrative access
- Managed phone profile
- Java Version 1.6 or higher
- Internet Explorer
- Note: Chrome and Firefox were supported previously, but Sky for NetSuite will not function with newer versions of these browsers that do not support Java apps.
Installation
There are multiple steps required to set up Sky for NetSuite. To begin the process, contact Support and provide your NetSuite Account Number.
Support Provisioning
A Support staff member who has Administrator privileges in NetSuite is required to perform the following two steps to enable a NetSuite client using the Sky for NetSuite Suite App:
- Enable the Sky Application Integration Solutions for all required user profiles:
- Copy Account ID
- Enable Account ID for SuiteApp
- Configure the system for NetSuite.
Customer Enablement Steps
After the Support Provisioning steps above are completed, a NetSuite customer needs to perform the following steps:
- Install Bundle
- Manage Users
- Enable User
- Enable Role
- Install Adapter
- Enable Telephony Integration
- Enable Script
- Setup Dashboard Shortcut
- Manage Browser Settings
Install Bundle
Use the following instructions to install the Bundle for the adapter into your Netsuite Instance.
- Select Customization > Suite Bundler > Search & Install Bundles.
- Search for Mitel under Keywords.
- Click Sky Connect for NetSuite.
- Follow the on-screen instructions to install the Bundle.
- NOTE: This may take up to 15 minutes to complete.
Manage Users
To grant CTI access to use the Sky for Netsuite adapter follow the instructions listed below.
NOTE: Both the employee and the employee's role must be enabled for the adapter to work.
Enable User
This is a one step process per individual employee.
- Select Lists > Employees > CTI Users.
- Click New.
- Use the drop-down to select an employee.
- Select the CTI Phone Enabled checkbox.
- Enter the employee phone number in the CTI Phone Number field.
- Enter the voicemail password in the CTI Phone Number Password field.
- Click Save.
- Click List link to review changes.
- Repeat for each user.
Enable Role
This is a one step process per Role. If you have already enabled the role, proceed to Install Adapter.
- Select Setup > User/Roles > Manage/Roles.
- Click Edit next to the role being enabled.
- For each employee role that you enable the feature, ADD the following permission:
- In the Permission field, select Custom Record Entries.
- This may already be enabled.
- Select View from the Level drop-down menu.
- Click Add.
- Click Save.
- NOTE: Customizing a Standard Role creates a new role labeled "Custom X". Users must be migrated from the standard role to the custom role.
Continue by proceeding to the Install Adapter section below.
Install Adapter
The following steps need to be performed on EACH user workstation or PC that requires the call control application. Note that each workstation has minimum requirements.
NOTE: All of the following steps need to be completed before you can run the software.
Enable Telephony Integration
NOTE: This step may already be enabled by default on some instances.
- Select Setup > Company > Enable Features.
- Scroll down to Integration Add-ons.
- Select the Telephony Integration checkbox.
- Click Save.
Enable Script
- Select Setup > Customization > Scripting > Scripts.
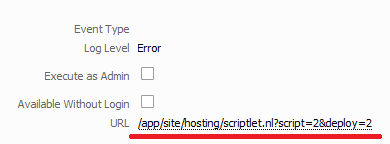
- Click Deployments to the right of the Sky Suitelette script.
- Click View, as shown in the image below.

- Copy the /app/site/hosting/scriptlet.nl?script=4&deploy=2 URL shown in the image below and paste it into Notepad.
- Select Home > Set Preferences, and then select the Telephony tab.
- Select CTI from the Telephone Option drop-down menu.
- Append the following to the parameters in the URL that was copied in step 4 above.
- The resulting URL should be like the following example:
- /app/site/hosting/scriptlet.nl?script=4&deploy=2&m5connect_dial={phone}
- Enter the URL in the CTI URL field, as shown in the following image:
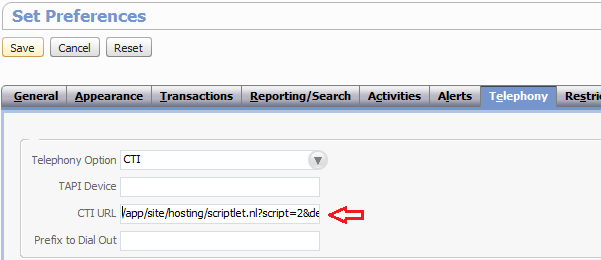
- Click Save.
Setup Dashboard Shortcut
- Select Home and navigate to the Shortcuts widget.
- Click the drop-down arrow and select New Shortcut.
- Enter the text Sky Application Integration Solutions in the Name field.
- Enter the copied URL into the URL field.
- Verify that the &m5connect_dial={phone} phrase is removed from the end of the pasted URL.
- Eliminate http:// from the field.
- Select the Open in new window checkbox.
- Click Save.
Manage Browser Settings
- If your browser is configured to open new windows in a new tab and not a new window, then the detach/tear tab feature should be used when running Sky for NetSuite. After launching Sky for NetSuite, pull away the tab from the interface so that it becomes its own window.
- Java plugin warning - Refer to the system requirements doc. Make sure each user has the right version of Java.
- Security warning - Accept the certificate.
Use
This section of the article includes the following topics:
Call Management
Update Call Information
Log
Customize Results Menu
Call Management
Place Call
Select the call icon next to the party you wish to dial.
- A pop-up will appear to indicate the party is being called.
- The State of the call will display Ringing Out in the Call Panel along with the number you are dialing or the Contact name if the contact is saved.
Answer Incoming Call
Select the call tab of the incoming tab or lift the receiver.
- Incoming calls are displayed in the call panel by a bouncing call tab.
Accept Second Call
Select the call tab for the incoming call.
- The initial call will be placed on hold automatically and the call tab will blink.
Place Call on Hold
Select the "Hold" button or select another call tab.
Resume Call on Hold
- Select the call tab for the call on hold.
- Select the Resume button in the Call Panel or on the phone.
- The State field will show the duration of the call on hold.
End Call
Press the End button or hang up the call through the receiver.
Update Call Information
- Select the Recently Ended Call tab.
- Update call information:
- Match caller from contact list
- Assign Subject
- Add comments
- Assign call priority
- Assign call result
- Click Commit when finished.
Log
- Select the Log tab in the call panel.
- Select a call.
- Select the CTI Related tab to access the following information:
- CTI Call Direction
- CTI Call Duration
- CTI Call Call ID
- CTI Call Result
- CTI Call Disposition
- CTI Call Duration
- CTI Call Call Match
- CTI Call Call Speaking to
Customize Results Menu
Edit
- Navigate to Setup > Customization > Lists.
- Click CTI Call result.
- Customize the values within the list under the Values tab.
- Click Save when complete.
- Restart Call Panel for changes to take place.
Add
- Within the Call Panel, select New from the Results drop-down menu.
- Add result in the Name field.
- Click Save.
Known Issues
The following known issues are associated with the 2014.2 release:
- Loss of Call Control - This issue occurs following a brief time out period. After several minutes, the Call Control panel functions in a dialing state only, until the panel is refreshed. To work around this issue, if a user experiences a loss of call control, refresh the call control panel window to resume the active call with access to all call controls. This issue may occur on a repeating basis, which requires multiple refreshes.
- Multiple Active Lines with No Status in the Call Control Panel - When this issue occurs, lines C1 - C6 will not flash when a NetSuite user has an incoming call or a call on hold. To work around this issue, when a call is incoming or on hold, the user may not see the call flashing on Lines C2 - C6 in the Call Control Panel. The user must click each of the available lines until the incoming call is found. Note that call information will not be lost as this issue only pertains to the highlighting of the active lines.
The following known issue is associated with the 2014.1 and 2014.2 releases:
- NetSuite User with an Active Mobility Endpoint is Unable to Place or Answer Calls - When this issue occurs, the Call Control panel attempts to use the Sky Mobility endpoint (network address) rather than the phone's endpoint. Call control buttons populate, but the user is unable to place or answer any calls. This issue occurs on a very intermittent basis. To work around this issue, if a NetSuite user, who also has Sky Mobility, can no longer place or answer calls, try refreshing the Call Control panel. If this does not resolve the issue, please contact Support to resolve this issue.
Related Topics
Sky Account Portal
Add-on Features
Application Integration Solutions
Opening a Support Case
MiCloud and Sky Support

