Table of Contents
Overview
Requirements
Order Conference Phone
Certification Details
Configuration Instructions
Overview
The Polycom SoundStation IP 6000 is an advanced IP conference phone that is supported in the Sky phone system. This conference phone delivers superior performance for small to midsize conference rooms and provides the following benefits:
- HD Voice
- Acoustic Clarity Technology
- 12-foot microphone pickup
- Advanced SIP endpoint software
- Robust interoperability
- High-resolution display
Click here to view the datasheet for the Polycom SoundStation IP 6000 conference phone.
Requirements
Managed Profile or Courtesy Profile
Order Conference Phone
To place an order, contact your Sky Account Manager or create a Support Case to submit your request to Sky Support.
Note that this conference phone is available for rental only.
Certification Details
The following shows supported features, limitations, and known issues for the Polycom SoundStation IP 6000.
Supported Features
- Profile Login
- Profile Logout
- Inbound PSTN call complete
- Outbound PSTN call complete
- 4-digit internal call complete
- Date/Time Sync with NTP Server
- Hold/MOH
- Three Person Conference Call local to the device
- Transfer Consult
- Transfer Blind
- Split (Separates a conference call)
- Multiple call management
- Redial
- Mute
- Do Not Disturb
- Contact Directory Add/Delete/Call (but it does not show personal directories or company directory)
- Missed Calls Display
- Call History
- Display Caller ID
- Client matter codes
- Reject Call
- End Call
Generic SIP Device Limitations
Voicemail
- The Messages button dials the profile
- There is no visual Voicemail notification on the screen
Conference
- Meet-me conference calls are required for calls with over three parties.
- While on the conference bridge, there is no conference floor control
Directory
- The phone does not display the company directory, the personal directory, or speed dials. However, you are able to add contacts directly to the phone.
Call Handling
- Call Forward: Enabling Always forward works, but Enabling No Answer and Busy Forward does not work. Changing the three forwarding settings on the device do not change the profile in the portal.
- Amount of Rings: Changing the number of rings does not change the setting in portal, but does change the number of rings on the phone.
- Shared Line: Calling a shared line associated with the profile does not ring the Polycom conference phone.
- Ring Groups: If the profile is in a ring group, the call does not display as a ring group call nor display the ring group name.
- Time of Day Control: This feature is not supported on the display.
Help Button
- There is no help button on the phone
Group Features
The following Group Features are not supported:
- Park/Unpark
- Pickup
- Intercom
- Page
- Barge
Known Issues
- Outbound Dialing - To complete an outbound call to a 10-digit external phone number, the number should be dialed prior to activating the line (also known as "On-Hook" dialing). Calls to 10-digit external numbers will not complete when the line is activated prior to dialing the number (also known as "Off-Hook" dialing); outbound calls will be automatically attempted with the first 5 digits entered. Extension dialing can be accomplished utilizing either "On-Hook" or "Off-Hook" dialing methods. You can read more about the differences regarding "On-Hook" and "Off-Hook" dialing in the Call Management article.
- Conference Dialing - After the first call has been established, the call can be placed on hold by pressing the Hold soft key. Then, the 10-digit destination phone number can be entered and the Dial soft key can be pressed. To merge the calls together, press the More soft key followed by the Join soft key. Note that the Conference soft key will open a line, but the limitation shown in "Outbound Dialing" above will apply.
- Dialing "91" Phone Numbers - When dialing phone numbers that begin with 91, for example, 917-555-1212, it takes several seconds to dial out.
- Unavailable Status - When the device is linked to a profile that does not have an assigned contact, it will display "Unavailable" on the screen. After a contact is added to the profile, the device will no longer display the "Unavailable" status.
Configuration Instructions
Note that the Certified Firmware is version 4.0.4.2906, which can be downloaded at http://downloads.polycom.com/voice/voip/sip_sw_releases_matrix.html
To reset configuration settings, following the instructions in the following support document:
http://support.polycom.com/global/documents/support/technical/products/voice/SoundPointIP_Resetting_Log_Files_QT18298.pdf
- Reset Device Settings - will set phone password to 456.
- Reset Local Configuration.
- Reset Web Configuration.
NOTE: If the Polycom conference phone loads to a screen that does NOT display the date/time and two soft keys labeled as "New Call" and "Forward," perform the following steps directly below. Otherwise, if the phone's screen does display the date/time and two soft keys, skip to the "To Configure the Polycom Phone" section further below.
Steps required to get to the correct screen
- Connect the Ethernet Cable (lights on the top of the device turn red).
- After about 15 seconds the Polycom logo will appear on the screen and lights will turn off.
- Select the Setup soft key.
- Enter password (456), then press the OK soft key.
- Use arrows on the right side of the screen to navigate to Server menu, press the Select soft key.
- Edit Server Type - Use arrows to select Trivial FTP.
- Edit Server Address.
- Press a > 1A to utilize numbers.
- Enter the TFTP server.
- Press the OK soft key, then press Exit and Exit again.
- Select Save & Reboot.
- The phone will reboot and a sequence of events will occur on the screen.
- Could not contact boot server
- Loading application
- Running App = sip.ld
- Red lights will illuminate on top of device
- Welcome Screen
- You will now be able to access the menu to obtain the IP address and access the web configuration utility.
NOTE: If you enter the admin password and cannot access the web configuration utility, contact Support.
To Configure the Polycom Phone
- Find the IP address via Menu > Status > Network > TCP/IP Parameters.
- Navigate to the web interface: http://IP, login as admin, password 456 (If this does not work, use Polycom password 456)
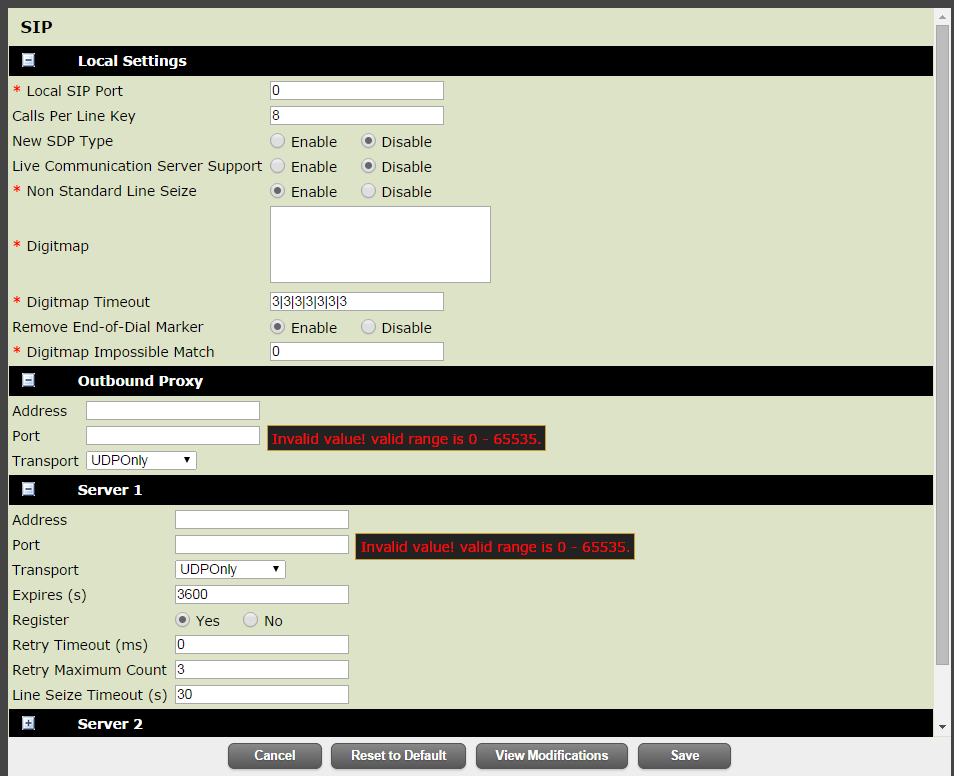
- Hover over Settings > Select SIP, which displays the SIP screen shown in the image below.
- Under Local Settings:
- Digitmap: [2-9]11|0T|R9RR011xxx.T|R9RR[0-1][2-9]xxxxxxxxxT|R9RR[2-9]xxxxxxxxxT|[2-9]xxxx
- If Outbound Dial Digit is 8 use the following: [2-9]11|0T|R8RR011xxx.T|R8RR[0-1][2-9]xxxxxxxxxT|R8RR[2-9]xxxxxxxxxT|[2-7,9]xx.T
- Under Outbound Proxy
- Address: TFTP Server Address
- Port: 15061
- Transport: UDPonly
- Under Server 1
- Address: TFTP Server Address
- Port: 5060
- Transport: UDPonly
- Everything else is set to the default
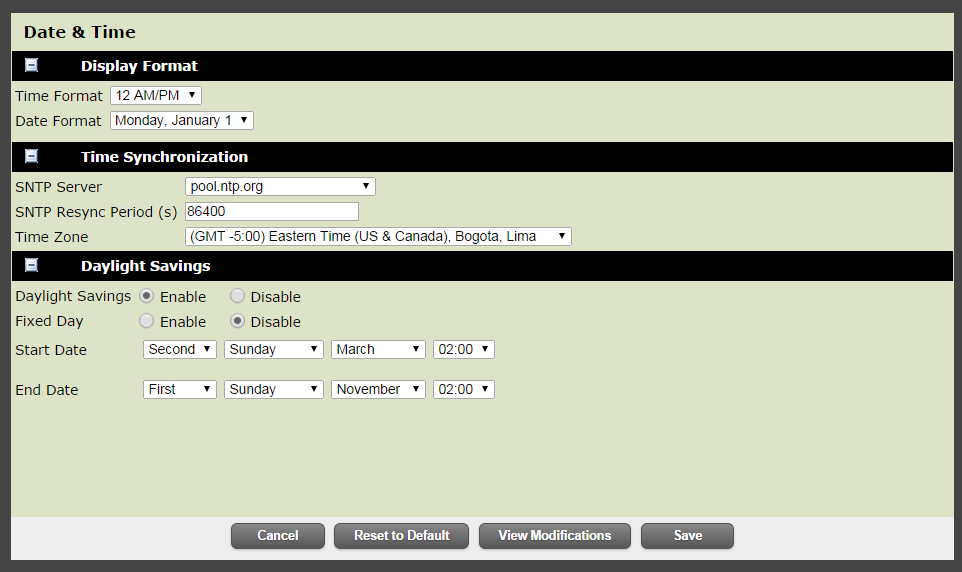
- Hover over Preferences > Select Time, which displays the Date & Time screen shown in the image below.
- SNTP Server : pool.ntp.org (**Only for Off-Net Customers)
- SNTP Server: IP of the G0/1 interface (**Only for On-Net Customers) (Select the blank entry in the drop down box and start typing)
- SNTP Resync Period 86400
- GMT Offset: -5 for EST, -6 for CST, -7 for MST and -8 for PST
- Daylight Savings: Enabled
- Fixed Day: Disabled
- Start Date: First Sunday March 02:00
- End Date: First Sunday November 02:00
- Click Save.
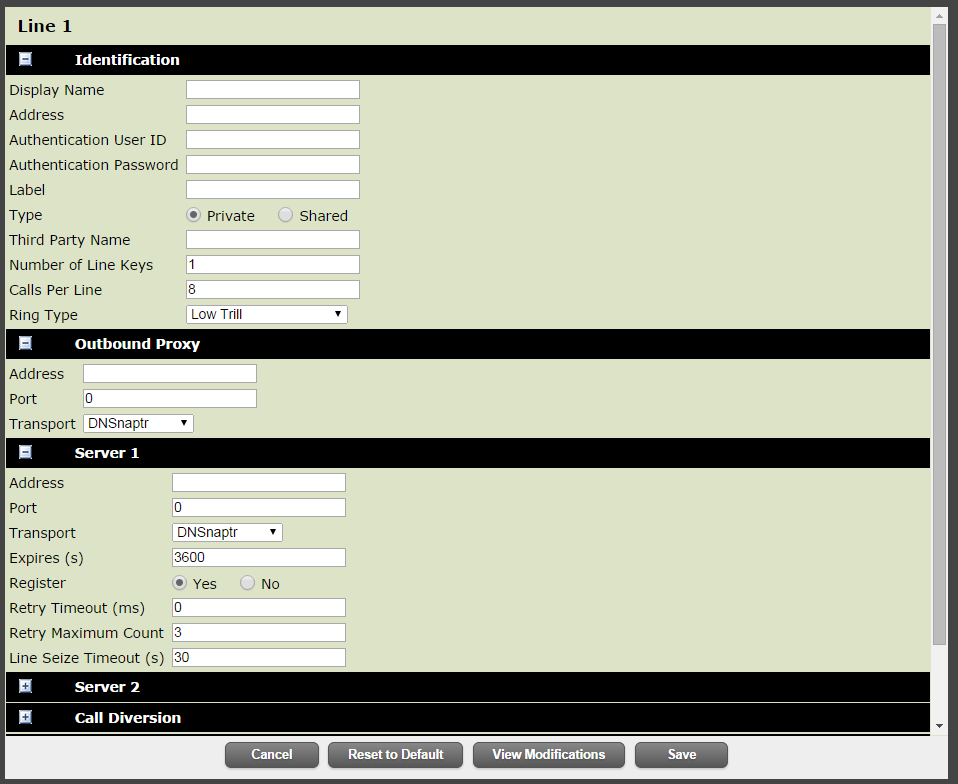
- Hover over Settings > Select Line, which displays the Line 1 screen shown in the image below.
- Below Identification, do the following:
- Address: 10 digit TN
- Authentication User ID: 10 digit TN
- Authentication Password: VM PIN
- Label: 4 digit extension
- Click Save.
- Configure VLAN ID via phone menu (this step can most likely be skipped).
- On the phone press Menu.
- Navigate to Settings > Advanced Password 456.
- Admin Settings > Network Config > Ethernet Menu > VLAN Menu > VLAN ID.

