Supported Headsets
To learn about supported headsets, see the What are the Supported Headsets for Softphones and IP Phones article.
Configure a Communication Device for Windows
To learn about configuring a communication device on a Windows computer, see the How to Set Up Softphone Communication Devices within MiCloud Client for Windows article.
Configure a Communication Device for Mac OS X
To learn about configuring a communication device on a Mac OS X computer, see the How to Set Up Softphone Communication Devices within MiCloud Client for Mac OS X article.
Enabling QOS on the Windows Softphone
Because the Client is running on a computer on the data VLAN, it is possible to use DSCP (Differentiated Services Code Point) if the data VLAN is configured for it. This feature can be utilized if users are experiencing audio or connection issues. To enable DSCP for Softphone running on Windows machines, a Local Group Policy must be added to each Window machine running the Softphone. Follow the steps below (Windows 7 example) to add a Local Group Policy to enable DSCP for the Softphone on Windows.
- Open a Command Prompt window to run the gpedit command.
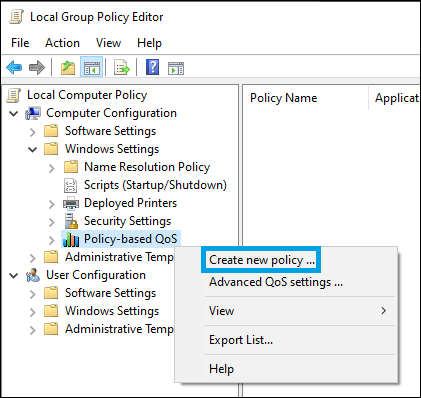
- Click to expand the Local Computer Policy entry and navigate to Computer Configuration > Windows Settings > Policy-based QoS.
- Right-click Policy-based QoS and select the Create new policy option.
- Enter the name of the policy, for example, MiCloud Softphone.
- Select the Specify DSCP Value checkbox and enter the value 46.
- Click Next to continue.
- Click the Only application with this executable name option and enter Mitel.exe. This is typically found here: C:\program files (x86)\mitel\connect\mitel.exe
- Click Next two times to continue.
- Select TCP and UDP from the drop-down menu in the Select the protocol this QoS policy applies to area.
- Click the Finish button.
Troubleshooting One-Way Audio on Softphone for Windows
When using a softphone on the Client users may experience one-way audio where users cannot hear the other end. Before troubleshooting the network, have the user check their Windows sound settings. There are two ways of correcting one-way audio when using the softphone, one is to have a defined default device and default communications device, and the other is to disable exclusive mode on the headset and mic.
Defining the Default Device for Communications
- In Windows, right-click the speaker icon and select Sounds.
- Go to Playback, right-click the headset being used, and select that headset as the default communications device.
- Go to the Recording tab, select the headset mic, and make it the default communications device.
- Completely close the Client.
- Open the Client and click the <username> tab on the dashboard.
- On the second pane, click the Settings
 icon, click Softphone on the left, and then select the Communications option from the Capture audio through drop-down menu.
 - Attempt to make a test call. If you are still unable to hear the caller, then please perform the Disabling Exclusive Mode steps listed below.
Disabling Exclusive Mode
- In Windows, right-click the speaker icon and select Sounds.
- Go to the Recording tab, right-click the headset, and click Properties.
- Go to the Advanced Tab, find the Exclusive Mode section, clear the Allow applications to take exclusive control of this device check box, and then click Apply.
- Reboot your computer to enable this change to take effect.
- Attempt to make another test call.
Troubleshooting: Not Getting Calls or Notifications After PC/Mac Awakens from Sleep/Hibernation
When the PC/Mac awakens after Sleep/Hibernation, it can take 90-120 seconds to reconnect to MiCloud. The user will not receive any notifications or inbound calls until the reconnection is complete.
Other Considerations
- Call quality performance is dependent on the performance of the machine on which the Client is running. If other applications that have high CPU usage are running on the same machine when the Softphone is used, call quality can be adversely impacted.
- There are features and functionality available on a desk phone that may not be available with the Softphone.
- Selecting Softphone in the Client sets your desk phone to anonymous mode.
- When the Softphone is active, ringing is heard over the default playback device (speakers) instead of the headset. This is done so users who do not have a headset can still be heard.
- The Softphone is not supported in thin client environments including Vmware Horizon View, Citrix, and Windows RDS/Terminal Services.
- If using the Softphone on a laptop with a docking station and wired Ethernet, and the laptop is removed from the docking station, the computer (and Client) will need time to reconnect to the wireless network. If a call is in progress at the time, the call will drop.
- When switching between the Softphone and your desk phone, and then back to the Softphone, there is a delay. The transition time averages 15-20 seconds. The reason for this delay is the SIP registration during setup and tear down that the desk phone performs when managing the switch.
- In the Portal, “Allow Extension Assignment” must be enabled in the user's User Group permissions to enable the user to toggle between desk phone and the Softphone in the Client. Navigate to Phone System > User Groups > Telephony Settings > Allow Extension Assignment
- In order to enable softphone, the User’s Profile must have a DID assigned.
- Corporate VPN’s may affect the operation of the softphone adversely. If you are experiencing issues disconnect from VPN to see if the problem is resolved.
- Peer to Peer (2-party) video is an option available with the Softphone. A Client Softphone user can call another Client Softphone user. After both parties have established an audio call, select the camera icon in the call window shown below to initiate a video call.