Configuring your MiCloud phone system with Okta allows users on your account to access MiCloud applications using their enterprise credentials.
Decision Makers and Phone Managers with administrative access to their organization's Okta account can configure single sign-on (SSO) for users on their MiCloud account.
NOTE: MiCloud supports SP-initiated SSO.
Prerequisites
To configure Okta integration with MiCloud, you need the following items:
- An Okta subscription/account
- A MiCloud account
- User's Office 365 email address should match with Mitel provisioning email address.
Adding the MiCloud App in Okta
To configure the integration of MiCloud with Okta, you need to add the MiCloud app to your Okta applications.
To add MiCloud to your Okta applications:
- In Okta, navigate to the Applications page.
- Click Add Applications.
- Type Mitel Connect in the search field and then click Add next to Mitel Connect.
- In the General Settings dialog box, click Done.
Configure MiCloud for Single Sign-On with Okta
This section describes how to enable Okta single sign-on for MiCloud in Okta and how to configure your MiCloud account to allow SSO using Okta.
To configure MiCloud with SSO for Okta, it is easiest to open Okta and the MiCloud Account Portal side-by-side. You will need to copy some information from Okta to the MiCloud Account Portal and some from the MiCloud Account Portal to Okta.
- Open the configuration dialog in the MiCloud Account Portal.
To open the configuration dialog:
- On the Phone System menu, click Add-On Features.
- To the right of Single Sign-On, click Activate or Settings.
The Connect Single Sign-On Settings dialog box appears.
- Select the Enable Single Sign-On checkbox.

- In Okta, navigate to the Applications page and then click Mitel Connect.
- Click the Sign On tab.
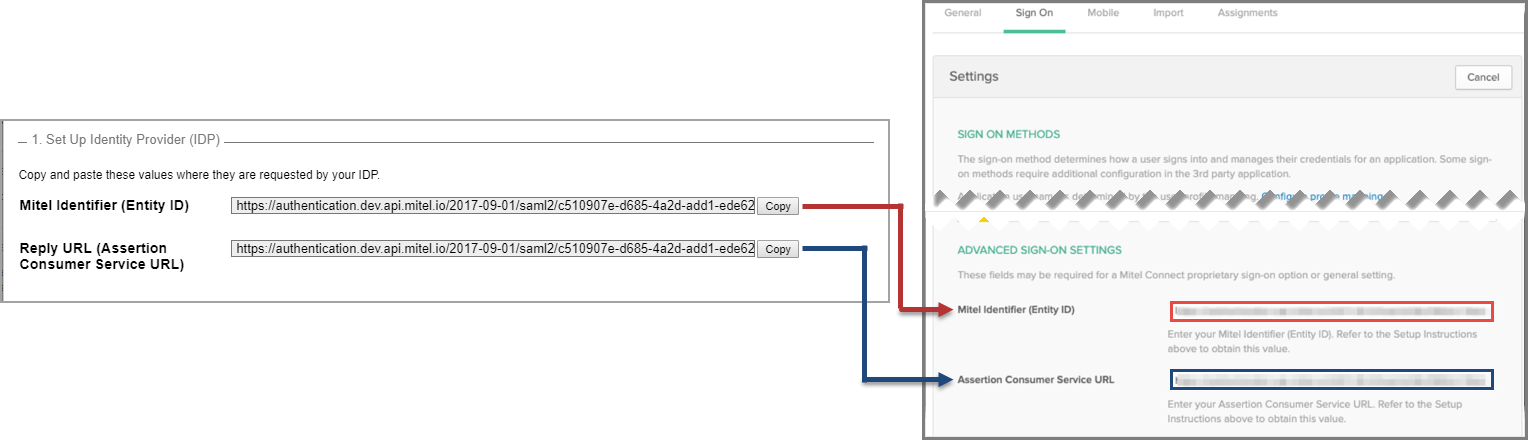
- Under Advanced Sign-On Settings, do the following:
- Copy the URL from the Reply URL (Assertion Consumer Service URL) field in the MiCloud Account Portal and paste it into the Assertion Consumer Service URL field in Okta.
- Copy the URL from the Mitel Identifier (Entity ID) field in the MiCloud Account Portal and paste it into the Mitel Identifier (Entity ID) field in Okta.
- Under Sign On Methods > SAML 2.0, click View Instructions.
- A new browser tab opens and displays the How to Configure SAML 2.0 for Mitel Connect Application information.
- On the How to Configure SAML 2.0 for Mitel Connect Application page, do the following:
- Copy the URL from the Identity Provider Single Sign-On URL field and paste it into the Sign-in URL field in the MiCloud Account Portal.
- Copy the URL from the Identity Provider Issuer field and paste it into the IDP Identifier (Entity ID) field in the MiCloud Account Portal.
- Copy the content from the X.509 Certificate field and paste it into the Signing Certificate(s) field in the MiCloud Account Portal.
- Click Save on the Connect Single Sign-On Settings dialog box in the MiCloud Account Portal.
Troubleshooting
| Problem | Solution |
|---|
| User cannot login via Auth Portal |
- Check monitoring dashboards / alerts
- Cloudlink Dashboards - SumoLogic
- Global Auth Dashboards - GCP
- 504 Gateway Timeout errors. This indicates that there is a connectivity issues in the Cloudlink - Summit Cloud - Connect chain.
- Check/capture following logs for debugging
- Browser console logs
- Browser network logs
|
| User does not get an option to login using single sign-On |
- Check if single sign on is enabled on user’s tenant
- Check if Enable Single Sign-On checkbox is selected in the Add-On feature Settings page
|

